How to Update VMware ESXi Hosts with Lifecycle Manager
Managing ESXi patches is every VMware admin’s bread and butter. It’s not the most glamorous job, but it is essential. However, as your vSphere environment grows, it can become time consuming to manage VMware patches across 100s of ESXi hosts. Enter vSphere Lifecycle Manager (vLCM)!
In this article, you’ll learn how to update ESXi hosts using vLCM. By the end, you’ll have all the information required to nail your next patching cycle, and save yourself precious time and energy that you can spend on more interesting tasks!
What is vSphere Lifecycle Manager?
vSphere Lifecycle Manager is a built-in vSphere service that provides centralized, automated patch and version management for ESXi hosts. Using vLCM you can perform the following tasks:
- Install patches on ESXi hosts using built-in or custom Patch Baselines.
- Upgrade ESXi hosts using Upgrade Baselines.
- Install and update third-party software on ESXi hosts.
vLCM was introduced in vSphere 7 and comes bundle with the vCenter Server Appliance (VCSA). This is awesome! It means you can dive straight into managing hosts with vLCM, using the built-in vSphere HTML5 Client plug-in, as soon as you’ve deployed your VCSA.
In previous vSphere versions vLCM was known as VMware Update Manager (VUM). Although there are some slight differences in the client interfaces, most of the tasks that you’ll see in this tutorial are essentially the same whether you’re running vLCM or VUM.
Managing the Lifecycle Manager Depot
Before you start updating ESXi hosts it’s a good idea to understand where the patches are stored in vLCM. vLCM uses the concept of a “depot” to store all of its different media such as ESXi updates, ISO images, and 3rd party vendor components.
Viewing available updates in the depot
To view all available ESXi updates in the depot:
-
Access the Lifecycle Manager plug-in via the vSphere Client, by browsing to Menu > Lifecycle Manager.
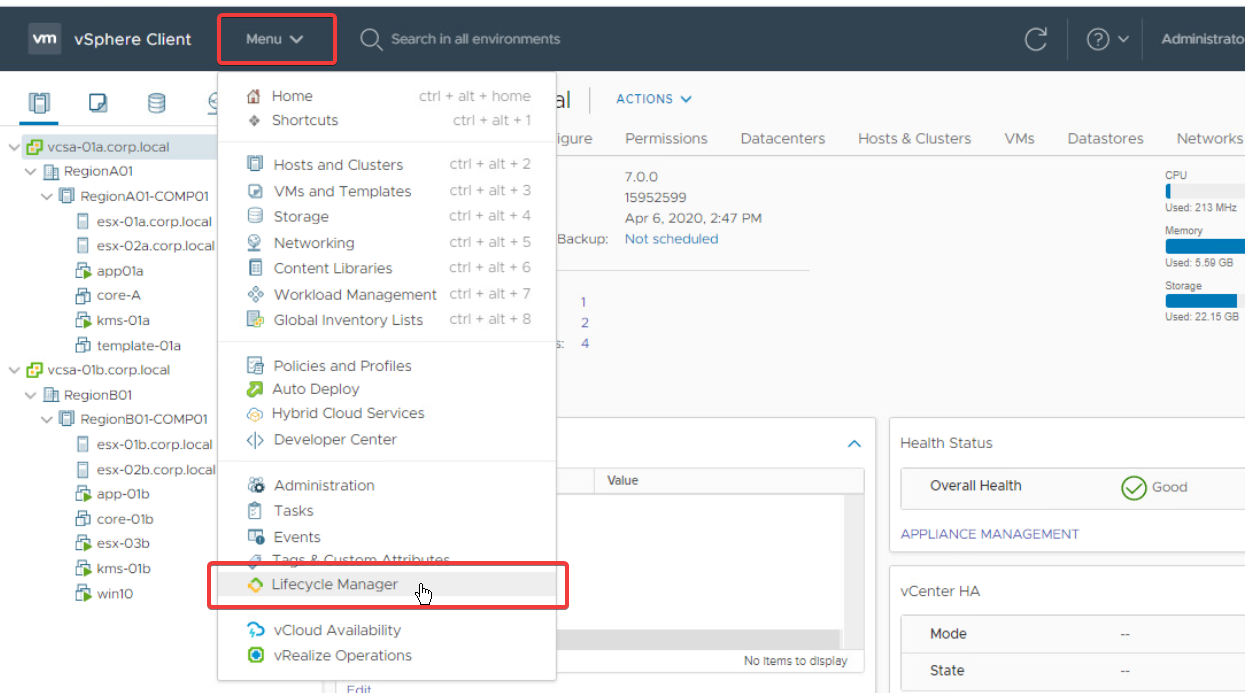
Accessing the vSphere Lifecycle Manager plug-in from the vSphere Client. -
Select a vCenter server from the dropdown menu and click the Updates tab. The available updates are shown in the main table.
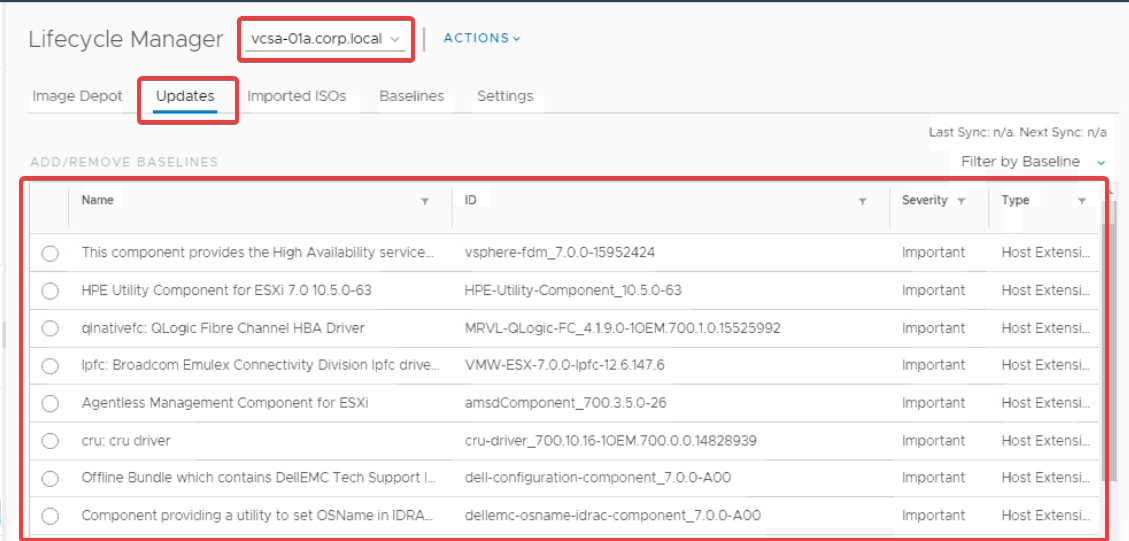
Viewing the available updates in the vLCM depot for a specific vCenter server.
Configuring automatic patch downloads
To ensure you have the latest patches available in your vCenter, you can configure vLCM to automatically download patches from the internet on a schedule. To configure this task:
-
In the Lifecycle Manager plug-in, select Settings > Patch Downloads > Edit.
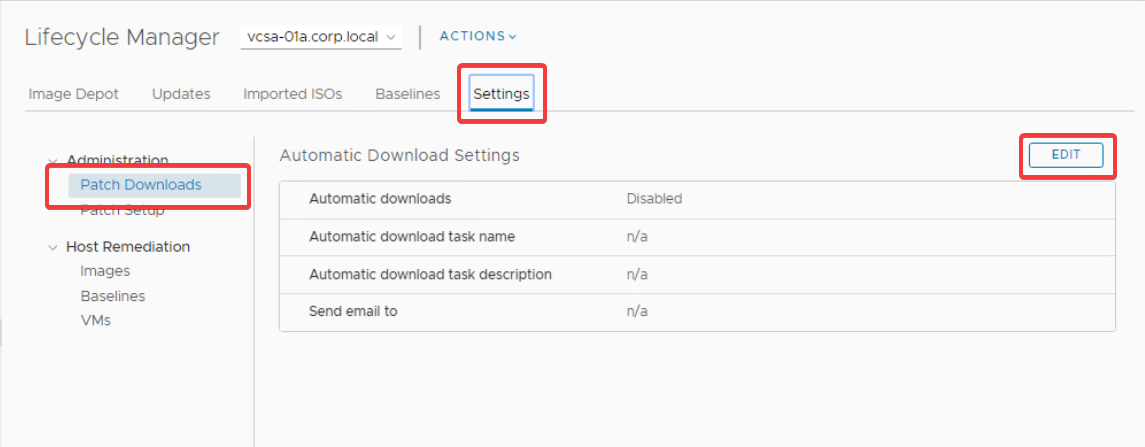
Launching the Edit dialog to configure the automatic download settings. -
In the Edit Settings dialog, check the Download patches checkbox, configure the schedule as required, and then click Save.
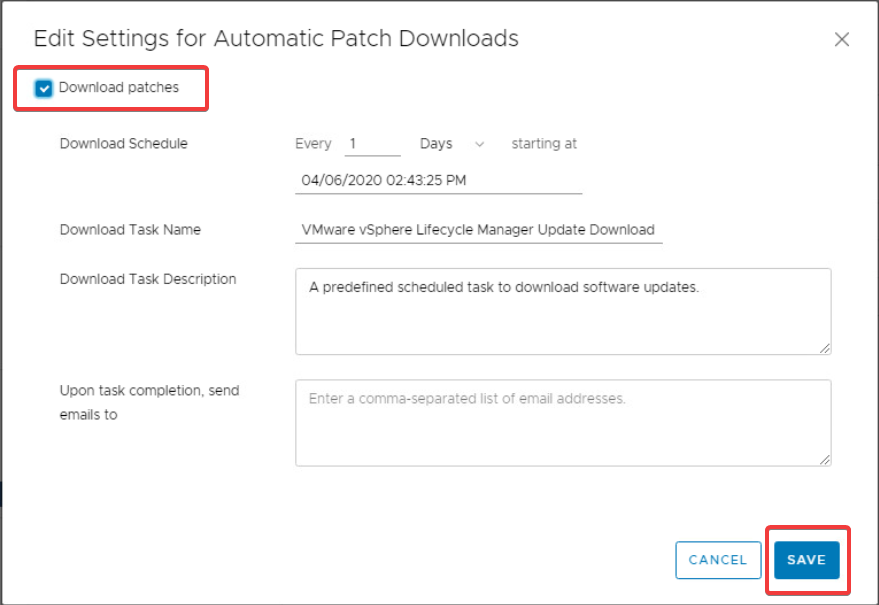
Enabling the download schedule in the Edit Settings dialog. If you’re behind corporate firewalls you’ll need to make sure there are rules in place allowing access to
https://hostupdate.vmware.comto download updates using this method. Alternatively, you can manually import updates into the vLCM depot, using an offline.zipfile.
Creating, attaching, and detaching patch baselines
Now you’ve configured vLCM to download the latest updates automatically, it’s time to look at ESXi patch baselines. Patch baselines are vLCM’s way of grouping together a set of patches to be applied to one or more ESXi hosts. There are two types of patch baselines, predefined and custom, as you’ll learn below.
Viewing predefined patch baselines
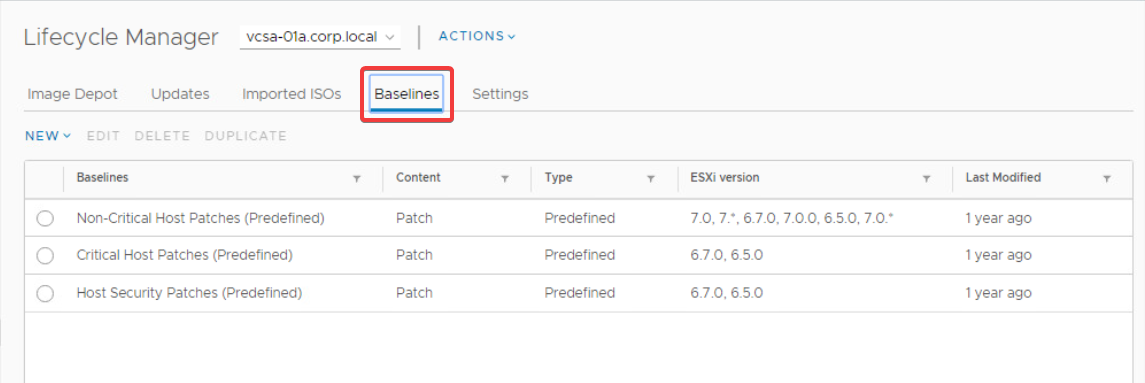
For your convenience, vLCM contains three predefined baselines out of the box. They are:
- Non-Critical Host Patches
- Critical Host Patches
- Host Security Patches
You can view these predefined baselines by selecting the Baselines tab in the Lifecycle Manager plug-in, as follows.
You may find that these three patch baselines are all you need to meet your patching requirements. However, if you require more control over the set of patches that a baseline contains, you’ll need to create a custom patch baseline.
Creating custom patch baselines
Custom patch baselines give you complete control over which patches to include in the baseline. You can create a baseline containing a fixed set of patches or create a dynamic baseline that updates the list of patches included as new ones are released. You can even mix both fixed and dynamic baselines, if you need to.
To create a custom baseline:
-
Select New > Baseline in the Baselines tab of the Lifecycle Manager plug-in. This will launch the Create Baseline dialog.
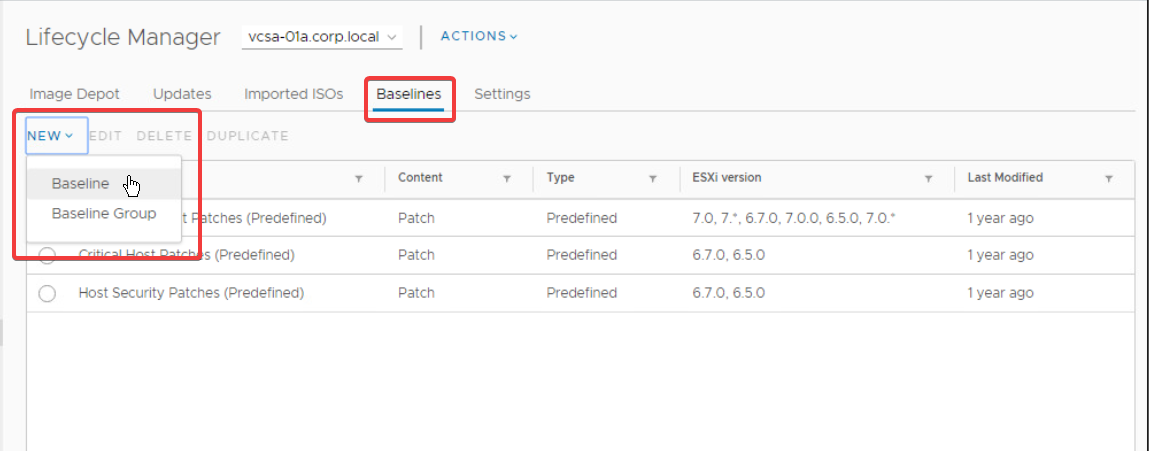
Launching the Create Baseline dialog. -
In the Create Baseline dialog, enter a Name for the baseline, select the Patch radio button, and click Next.
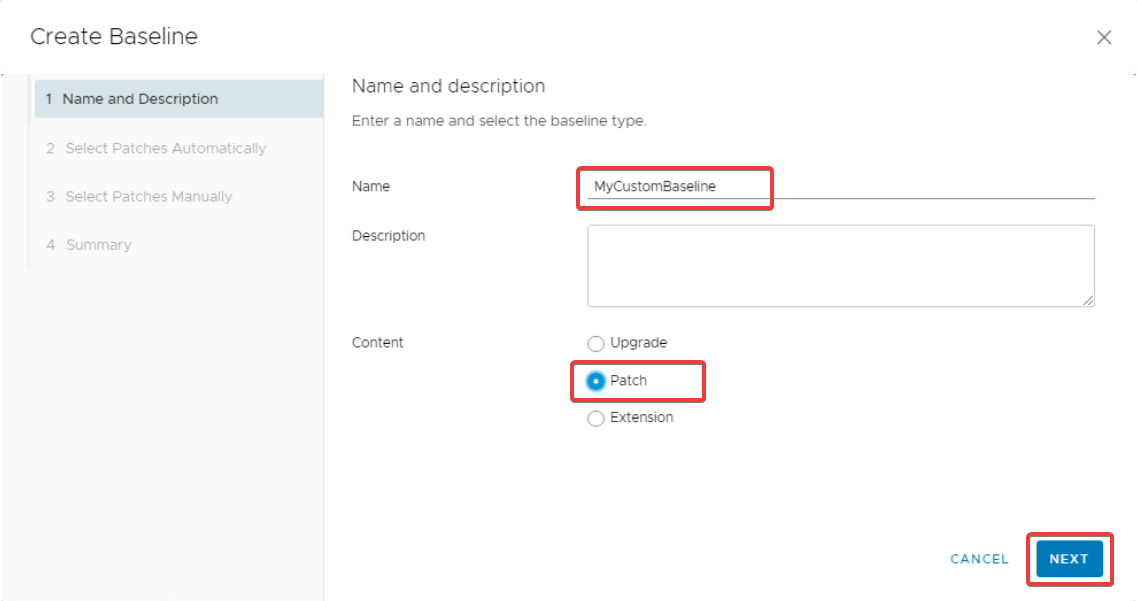
Entering a name for the custom patch baseline. -
In the Select Patches Automatically tab, you can create a filter to automatically include certain patches. For example, to include all patches for ESXi 7.0 check the Automatically update this baseline with patches that match the following criteria checkbox, select VMware from the Patch vendor list, and finally select embeddedEsx 7.0 from the Product list.
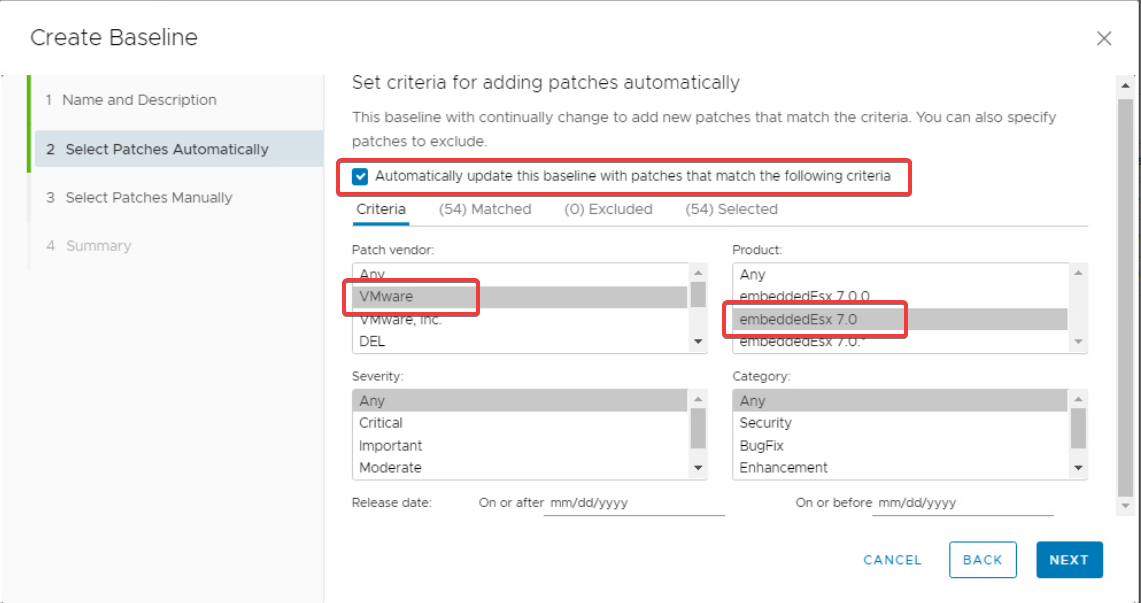
Configuring an automatic patch filter. -
To view the list of patches matched by the filter, you can select the Matched tab.
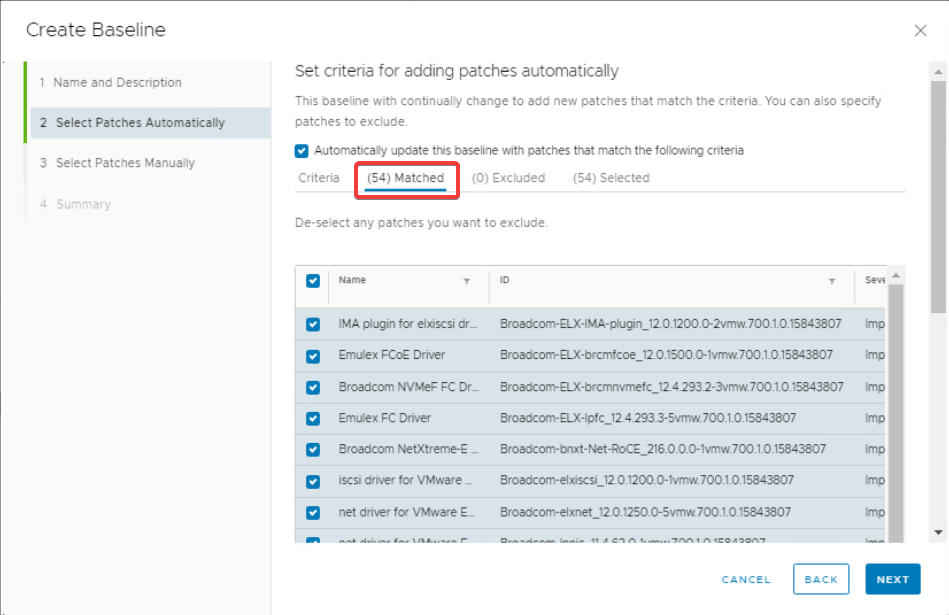
Viewing the select patches in the Matched tab. -
Once you’re happy with the filter criteria, or if you unchecked the Automatically update this baseline with patches that match the following criteria checkbox (to create a fixed baseline instead), click the Next button.
-
In the Select Patches Manually tab, you’ll see a list of patches which do not match the automatic filter criteria configured in the previous step (or all patches if you disabled the automatic filter). You can select any of these to manually include them in the baseline.
For example, to include the cru driver patch select it from the table and then click Next.
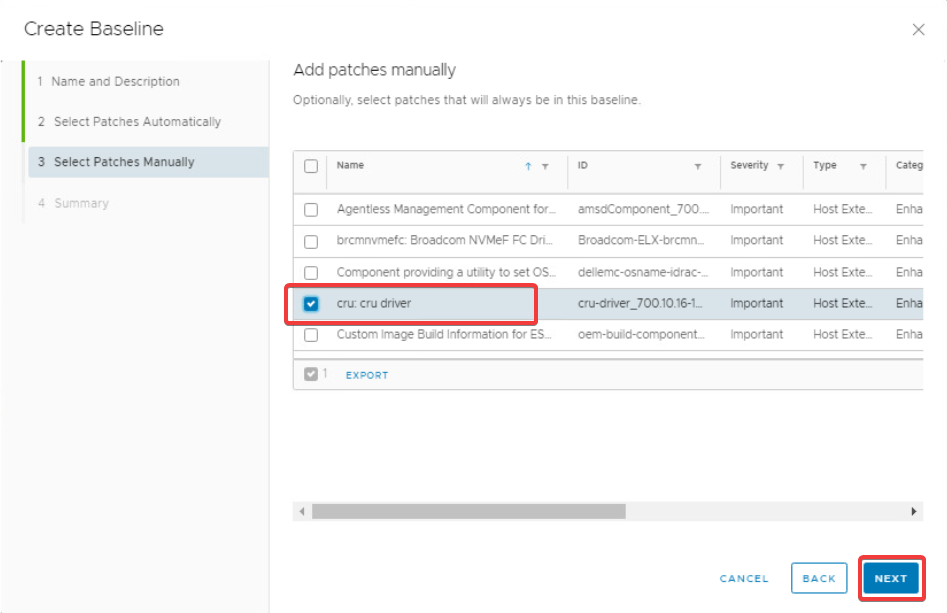
Including specific patches manually. -
Finally, review the Summary tab information and click Finish to create your custom baseline.
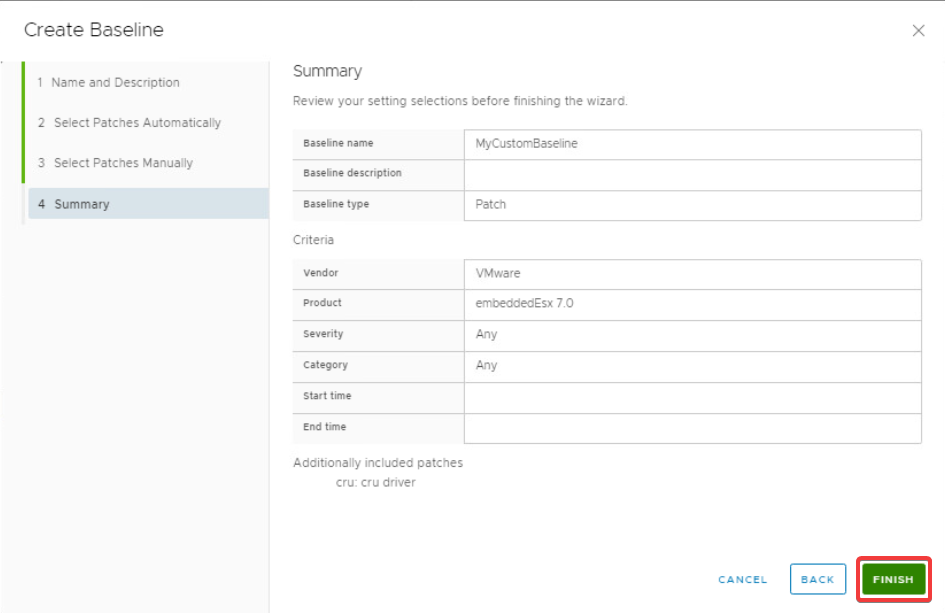
Reviewing the summary tab completing the baseline creation.
Attaching patch baselines to vSphere objects
To install a baseline’s patches on one or more ESXi hosts, you’ll first need to attach the baseline to a vSphere object. If you only have a couple of hosts, you can attach the baseline to the host objects directly. However, this does not scale very well. Instead, you can attach the baseline to an object higher up in the hierarchy, which will then propagate down to any children objects.
For example, to propagate the MyCustomBaseline baseline to the hosts esx-01a.corp.local and esx-02a.corp.local, you can attach it to the parent cluster object RegionA01-COMP01 using the following steps.
-
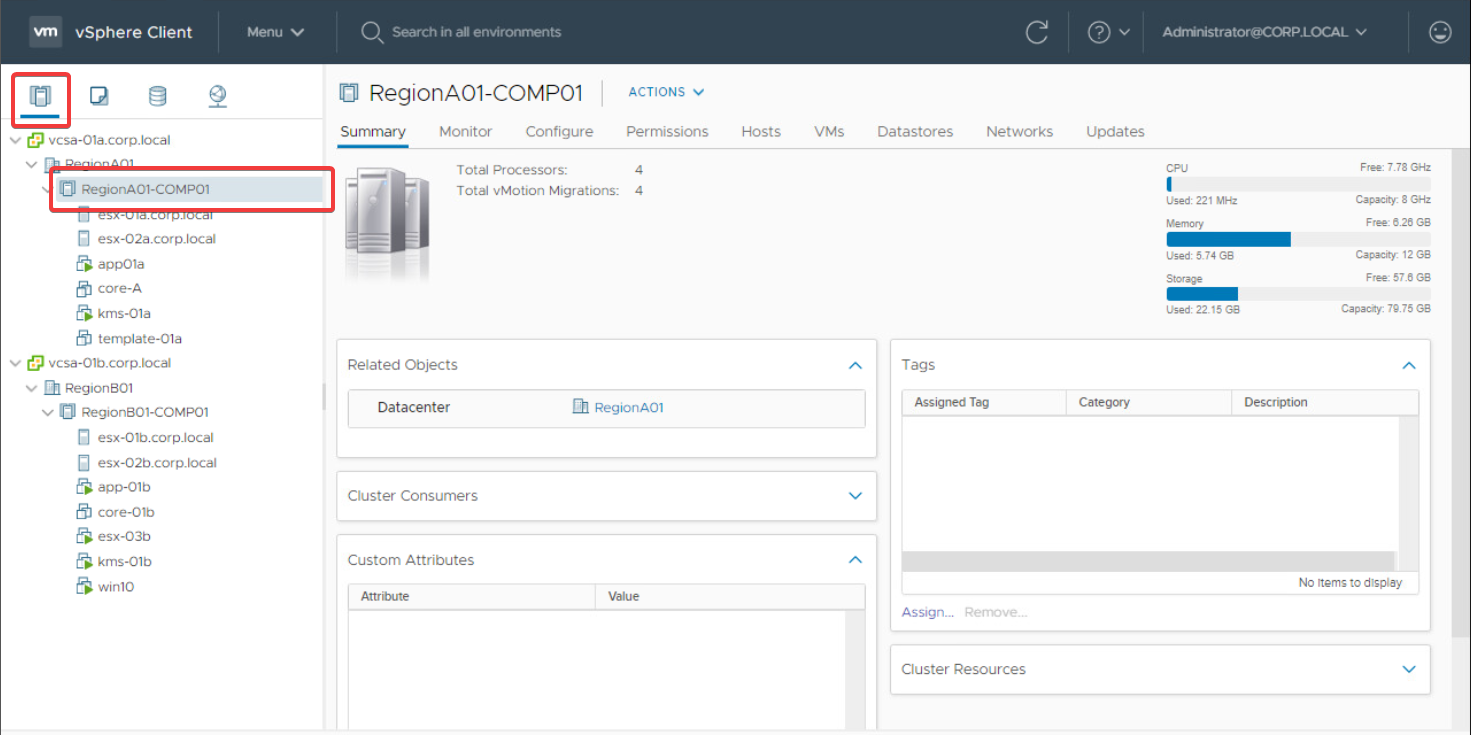
From the Hosts and Clusters view, click on the RegionA01-COMP01 cluster object in the navigation pane on the left.
-
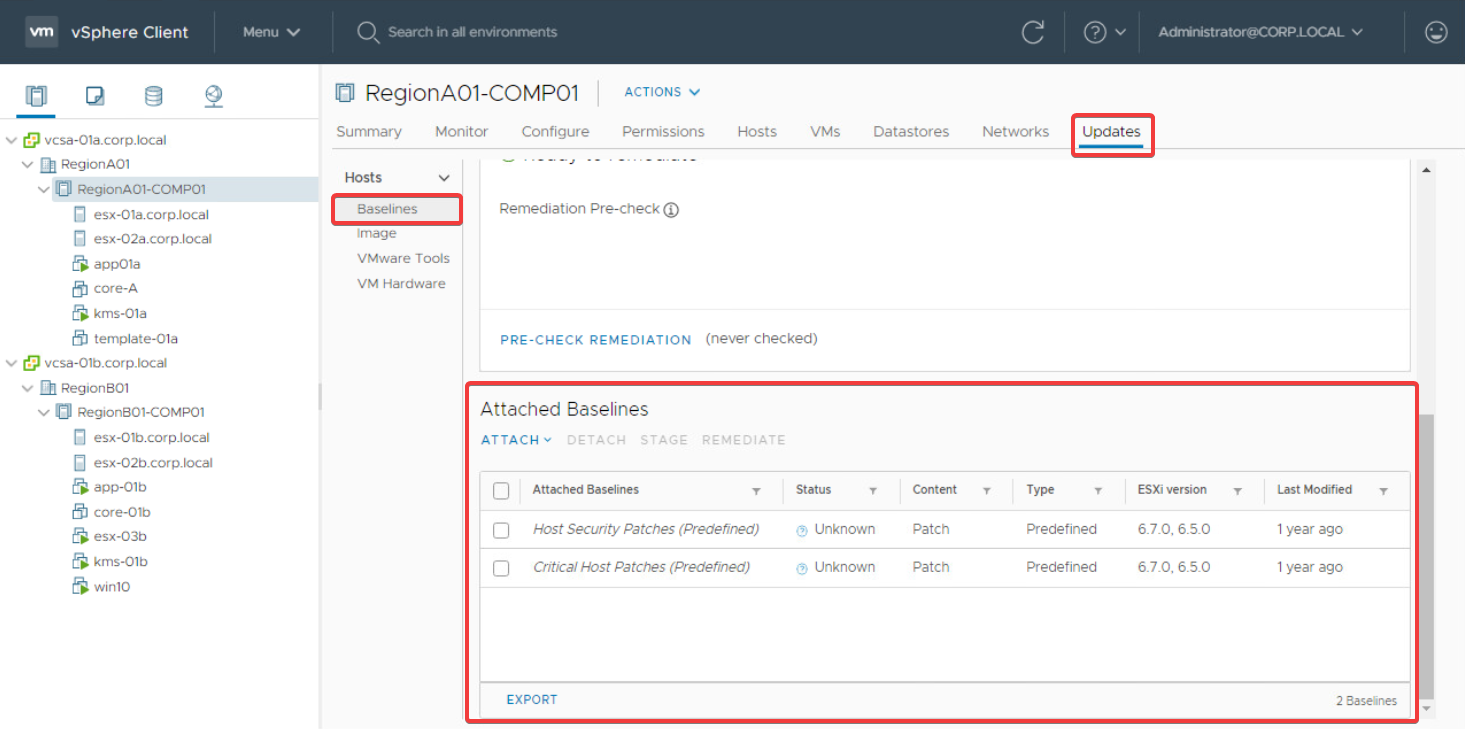
Go to the Updates tab and scroll down to the Attached Baselines section.
-
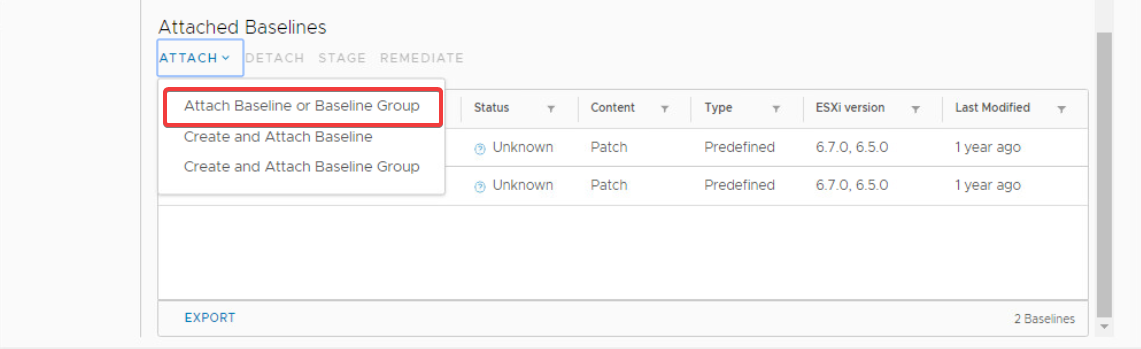
Click Attach > Attach Baseline or Baseline Group to launch the Attach dialog.
-
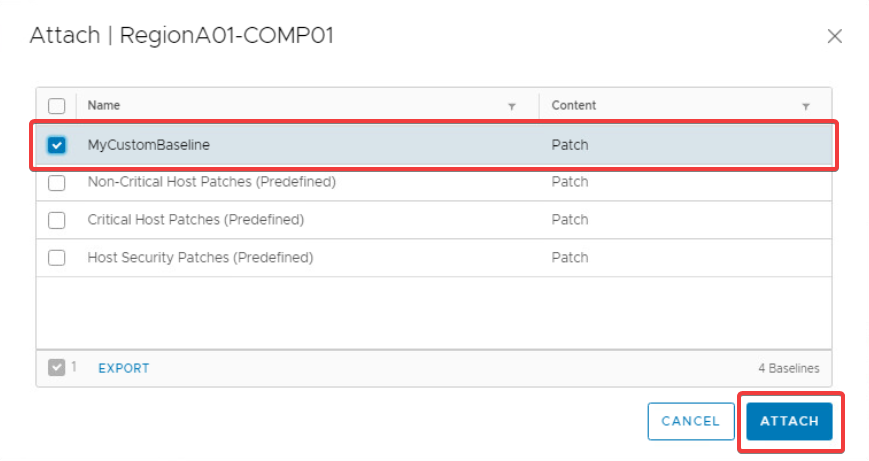
In the Attach dialog, select the MyCustomBaseline baseline object and click Attach.
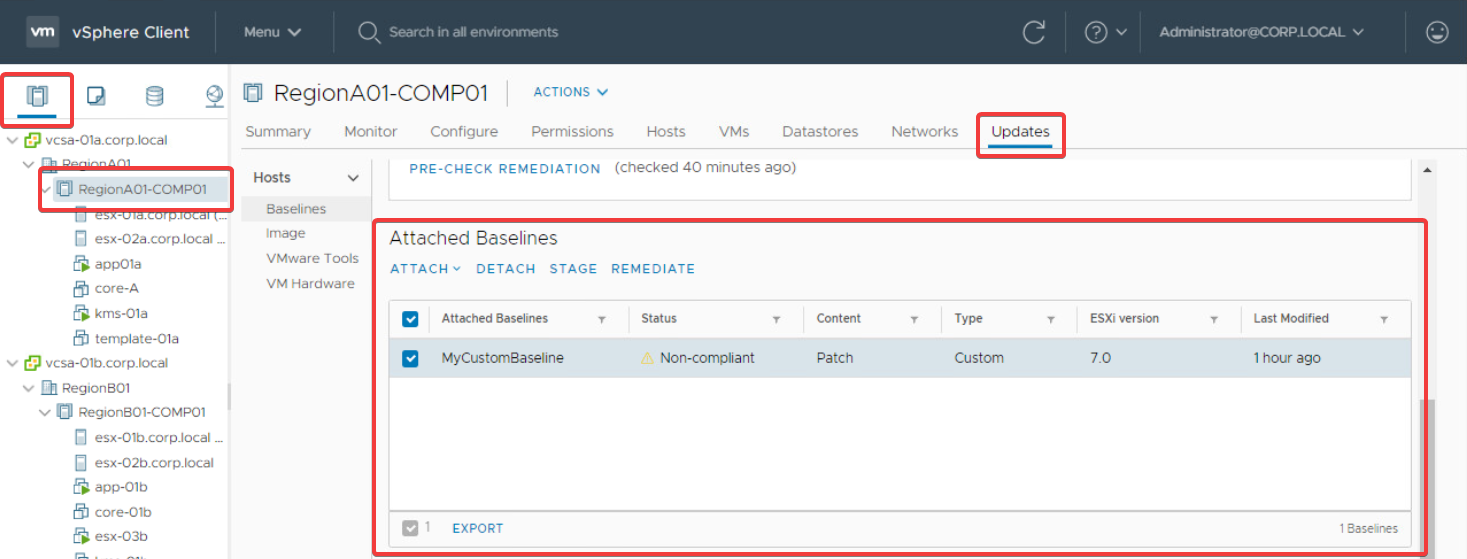
The MyCustomBaseline baseline is now attached to the RegionA01-COMP01 cluster object. To verify this, go to the Hosts and Clusters > RegionA01-COMP01 > Updates tab and scroll down to the Attached Baselines section, for example:
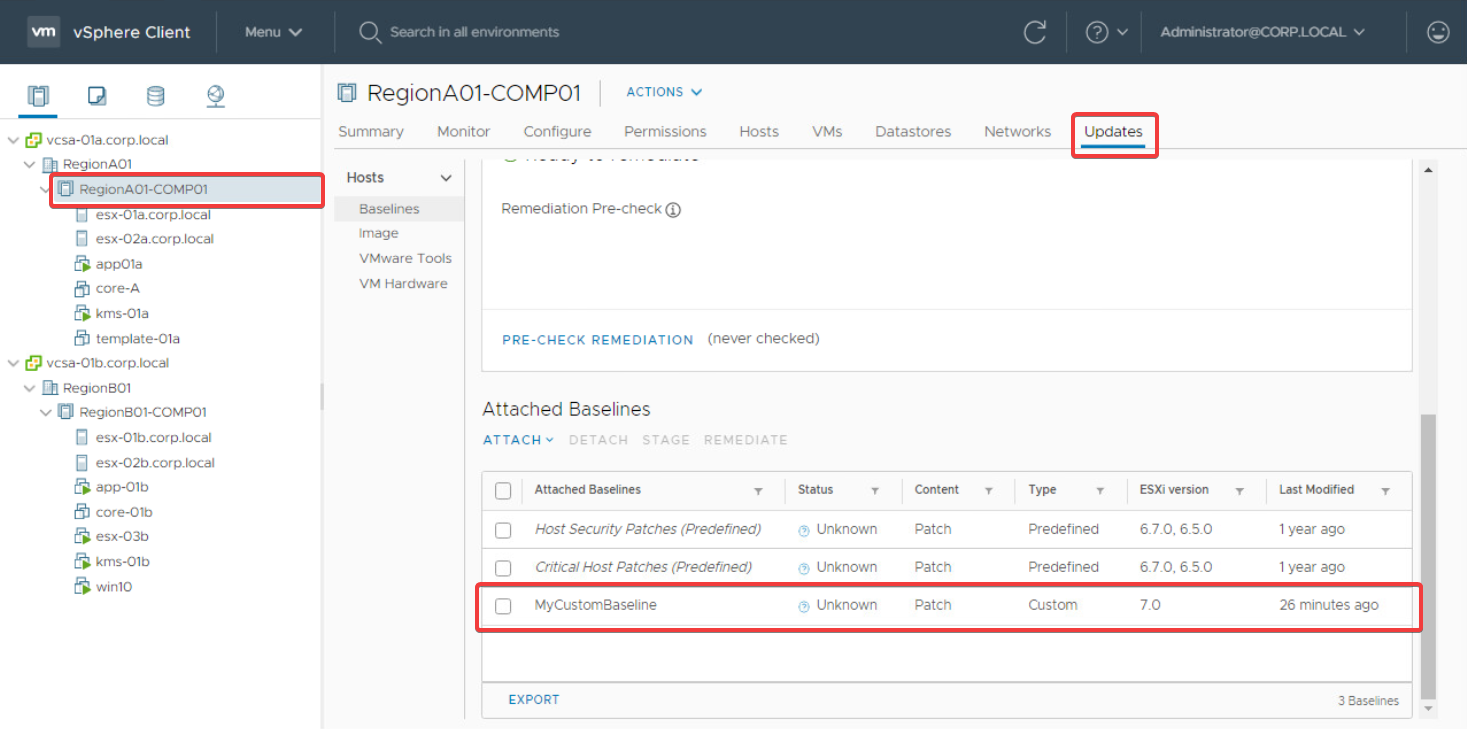
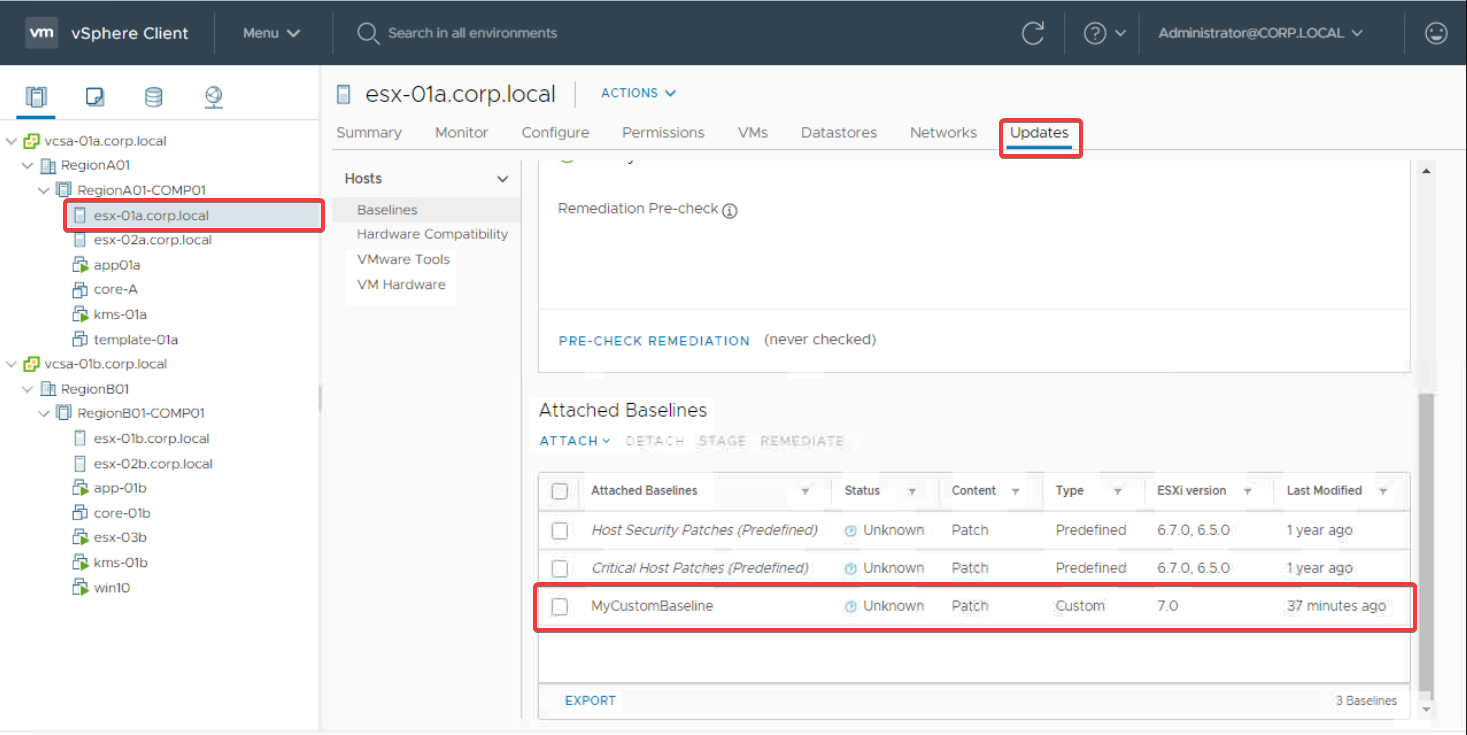
As mentioned previously, this also propagates the attachment to the esx-01a.corp.local and esx-02a.corp.local hosts, as they are children of the RegionA01-COMP01 cluster. You can verify this by going to the Updates tab of each of the hosts individually.
For example, to see the attachment for esx-01a.corp.local, go to Hosts and Clusters > RegionA01-COMP01 > esx-01a.corp.local > Updates and scroll down to the Attached Baselines section, as follows.
Detaching patch baselines from vSphere objects
You have seen how to attach a custom baseline to a vSphere object, but what about removing them? The process for detaching patch baselines is very similar to attaching them.
For example, to detach the two predefined patch baselines, Host Security Patches and Critical Host Patches, from the vcsa-01a.corp.local vCenter object, use the following steps.
-
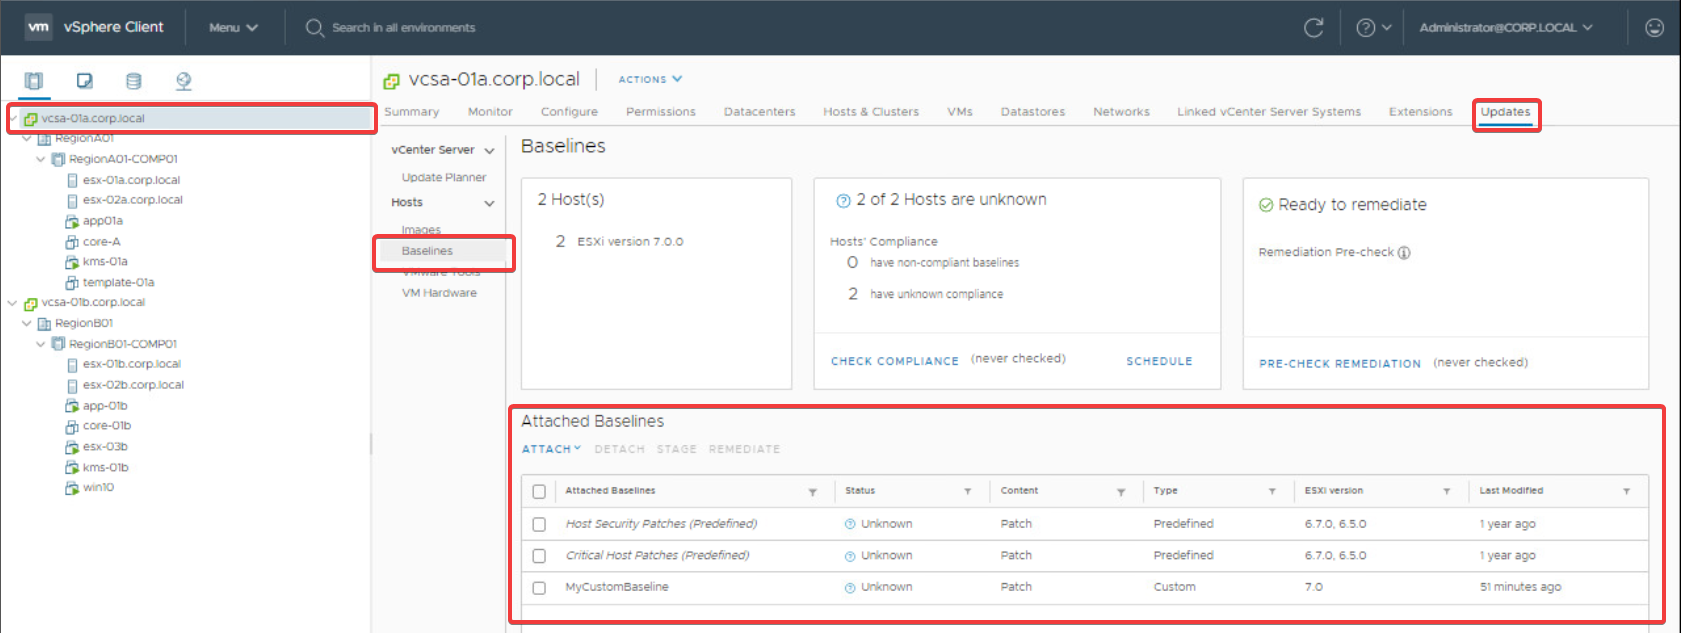
From the Hosts and Clusters view, click on the vcsa-01a.corp.local vCenter object in the navigation pane on the left, then go to Updates > Hosts > Baselines and scroll down to Attached Baselines.
-
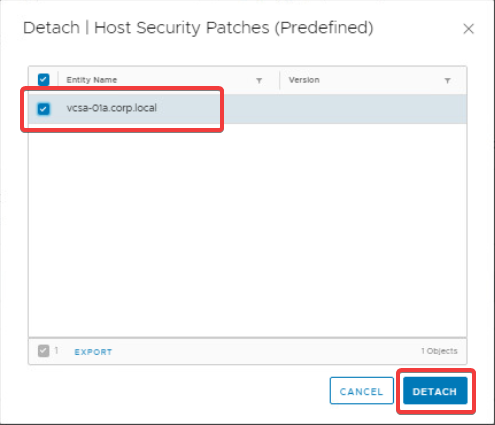
Select the Host Security Patches baseline and click Detach to launch the Detach dialog.
-
Select the vcsa-01a.corp.local object and click Detach.
-
Repeat steps 2 and 3 for the Critical Host Patches baseline.
Working with baseline groups (optional)
Baseline groups are used to group multiple baselines into a single logical container. While they are completely optional, they can be useful if you need to deploy multiple baselines at the same time.
For example, to create a baseline group (MyBaselineGroup) containing two patch baselines (MyCustomBaseline1 and MyCustomBaseline2) and attach it to the RegionA01-COMP01 cluster object, use the following steps.
-
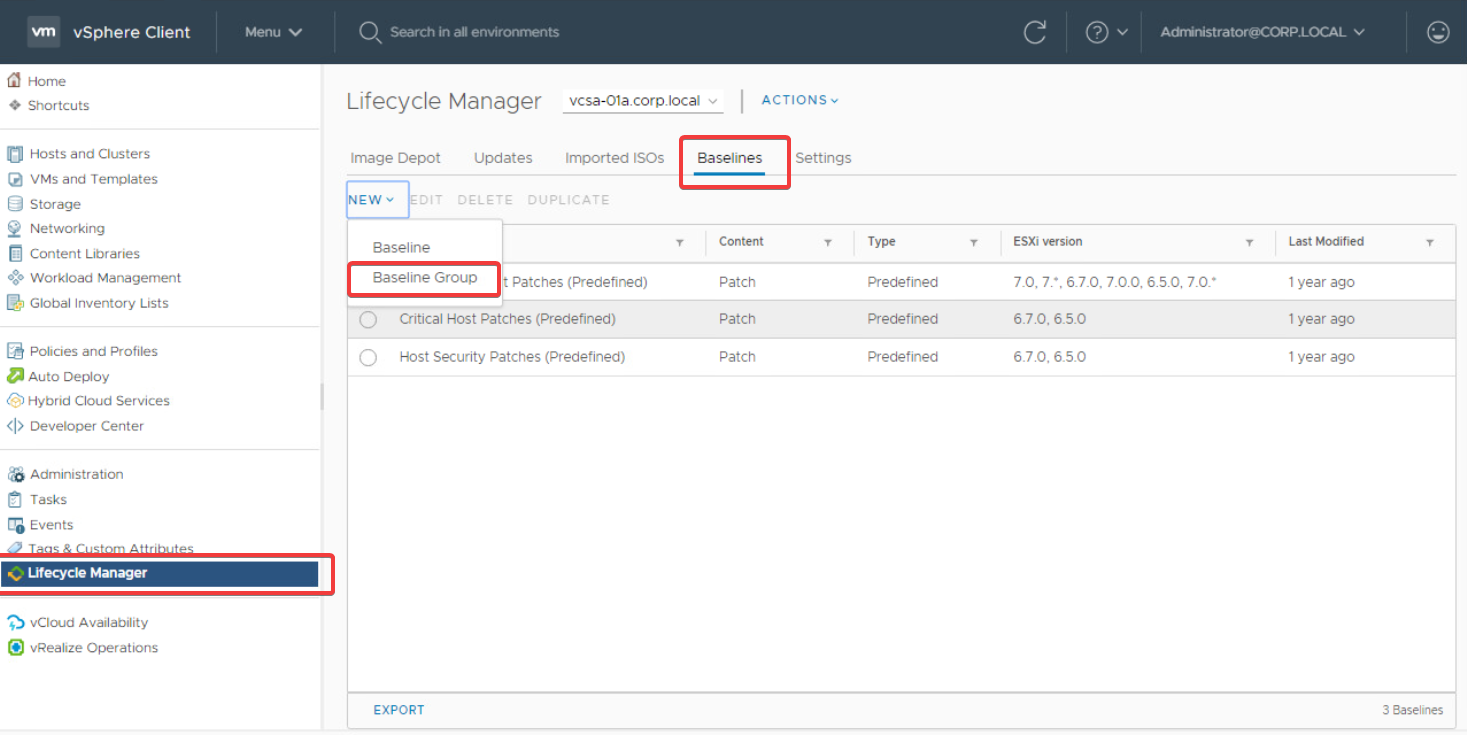
Go to Lifecycle Manager > Baselines and click New > Baseline Group.
-
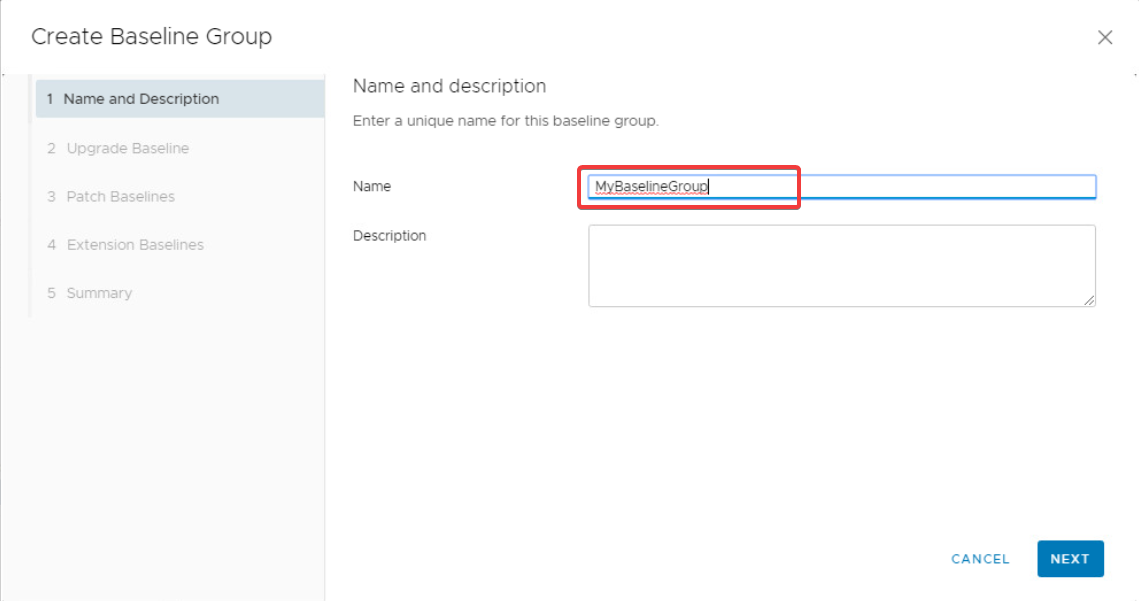
In the Create Baseline Group dialog, enter MyBaselineGroup in the Name field and click Next.
-
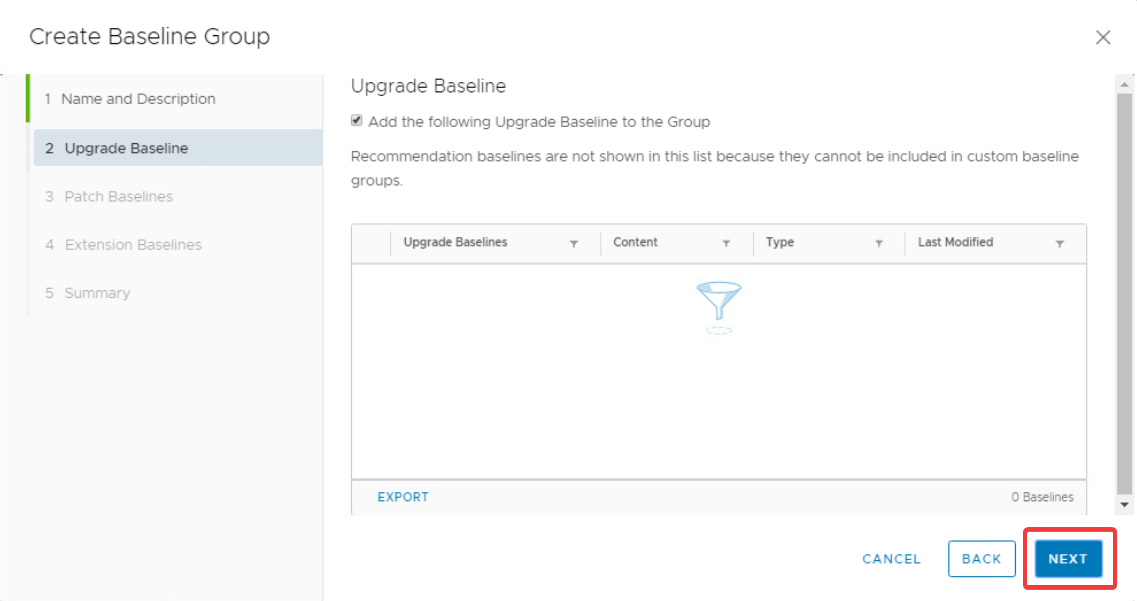
Click Next to skip the Upgrade Baseline page as this is not necessary for this example.
-
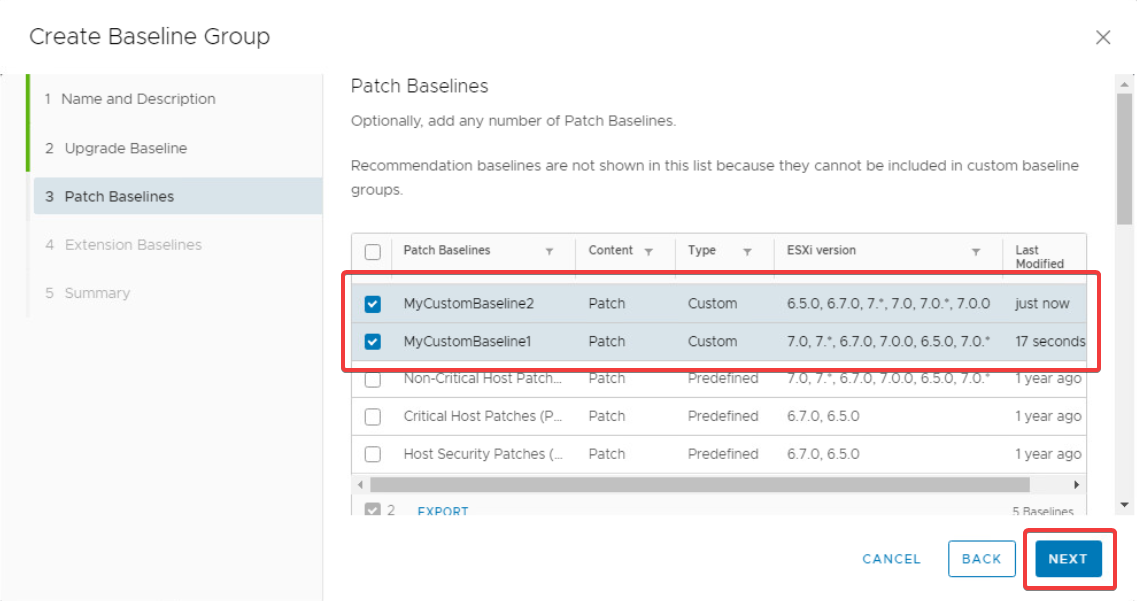
On the Patch Baselines page, select the MyCustomBaseline1 and MyCustomBaseline2 baselines and click Next.
-
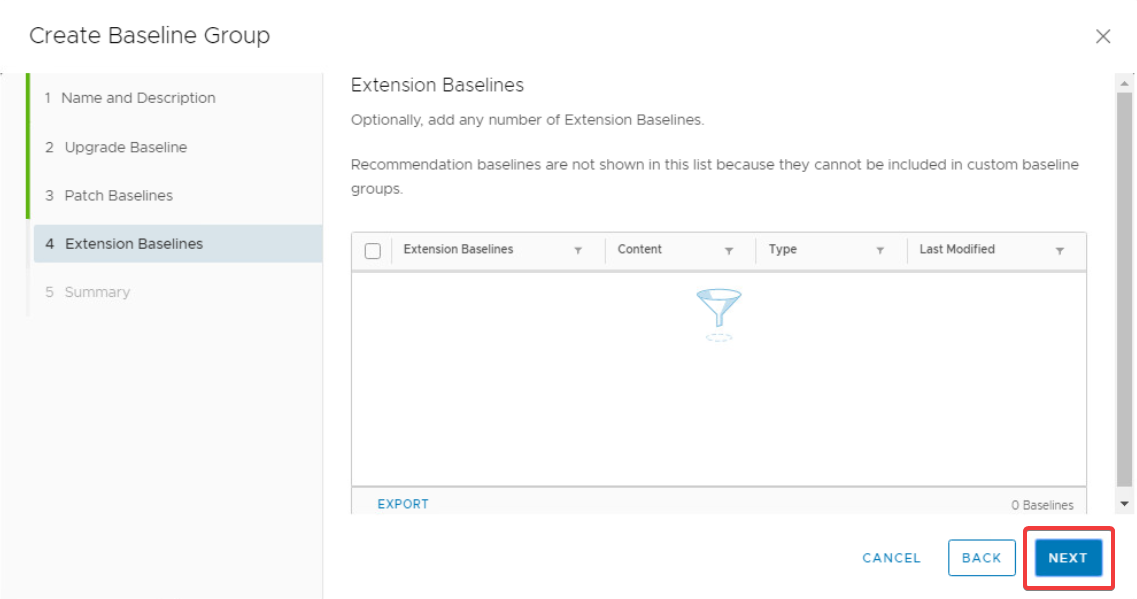
Click Next to skip the Extension Baselines page as it is not necessary for this example.
-
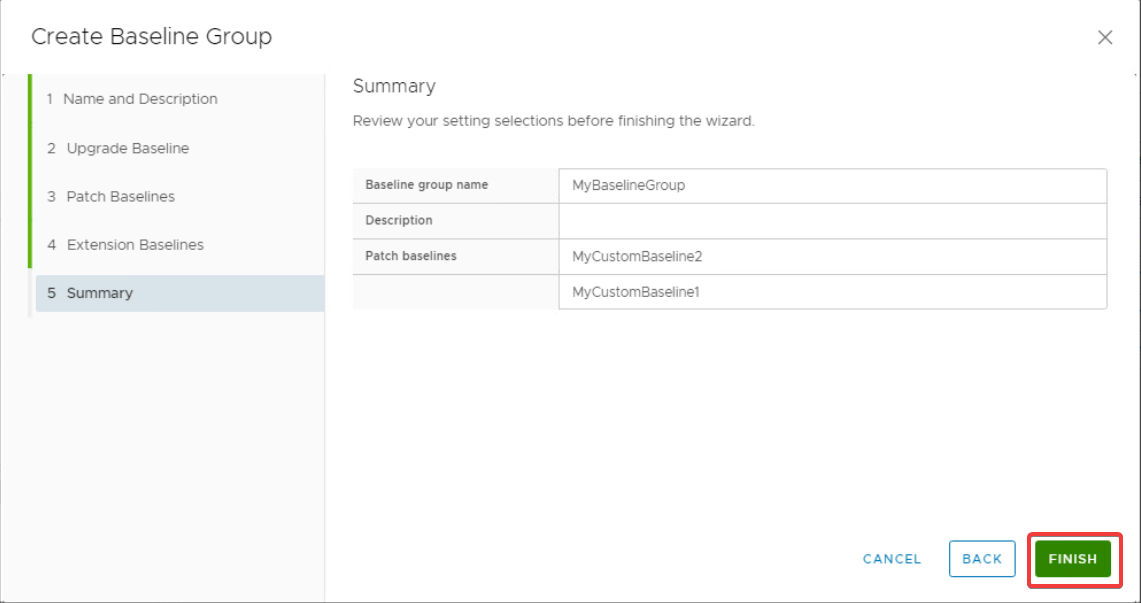
Review the Summary page and click Finish to create the baseline group.
-
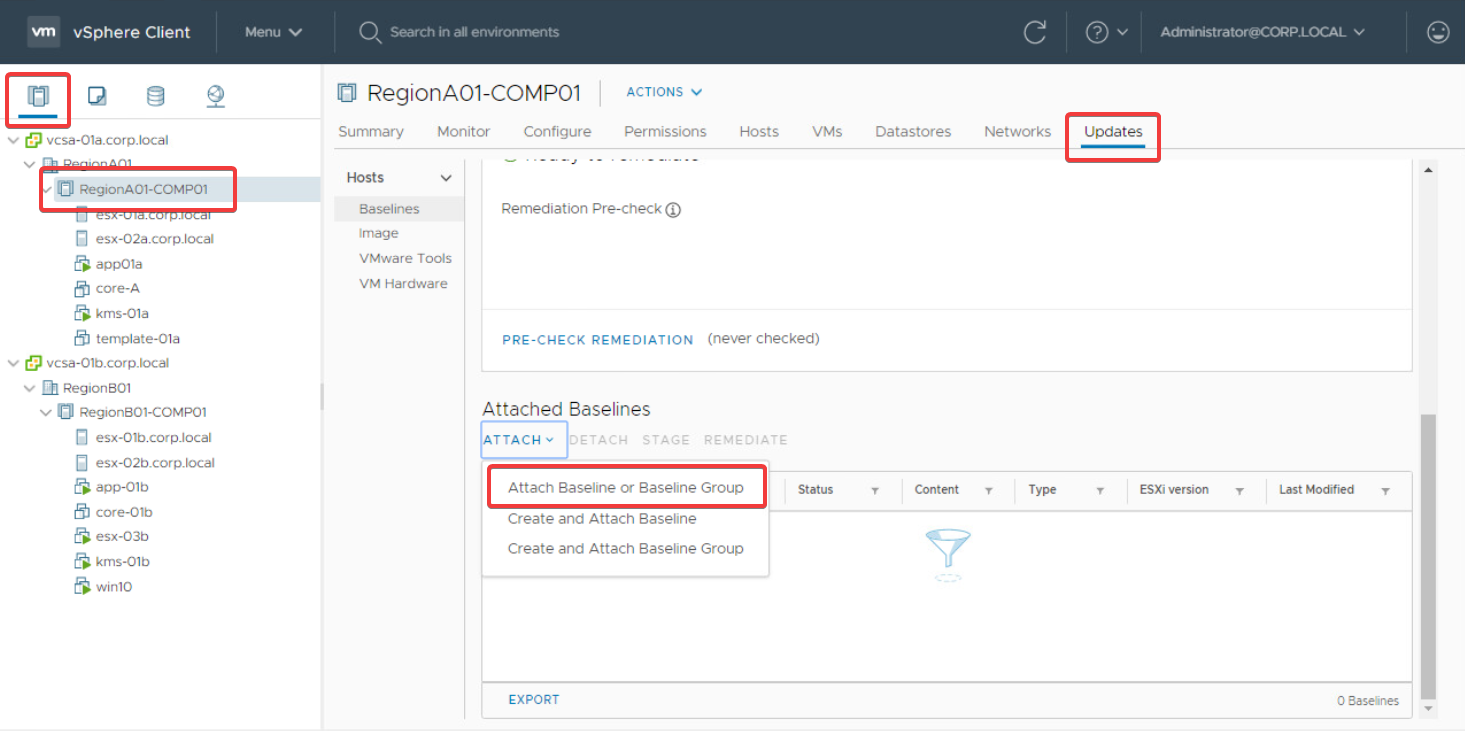
Now go to Hosts and Clusters > RegionA01-COMP01 > Updates and click Attach > Attach Baseline or Baseline Group.
-
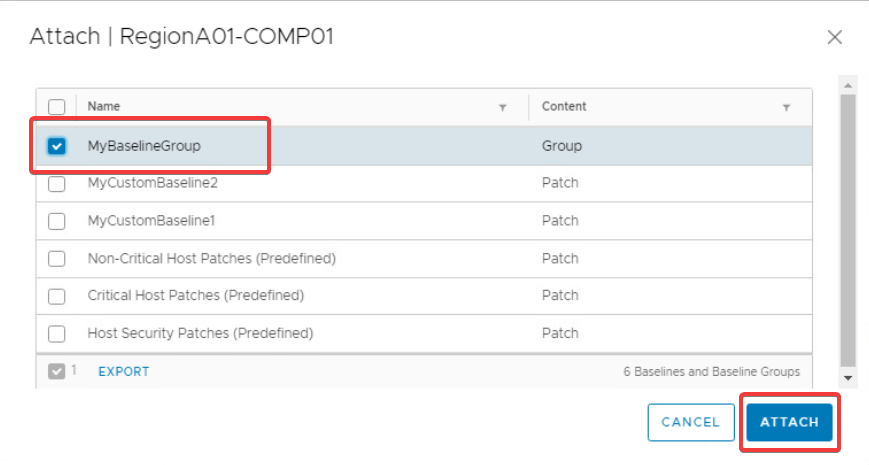
In the Attach dialog, select the MyBaselineGroup object and click Attach.
Running baseline compliance checks
To understand which hosts are missing patches from a baseline you can run the check compliance task. This will scan each of the targeted hosts and provide a status regarding whether they are compliant or non-compliant, helping you determine which hosts require remediation.
For example, to check the compliance for all hosts in the RegionA01-COMP01 cluster, use the following steps.
-
Go to Hosts and Clusters > RegionA01-COM01 > Updates and click Check Compliance.
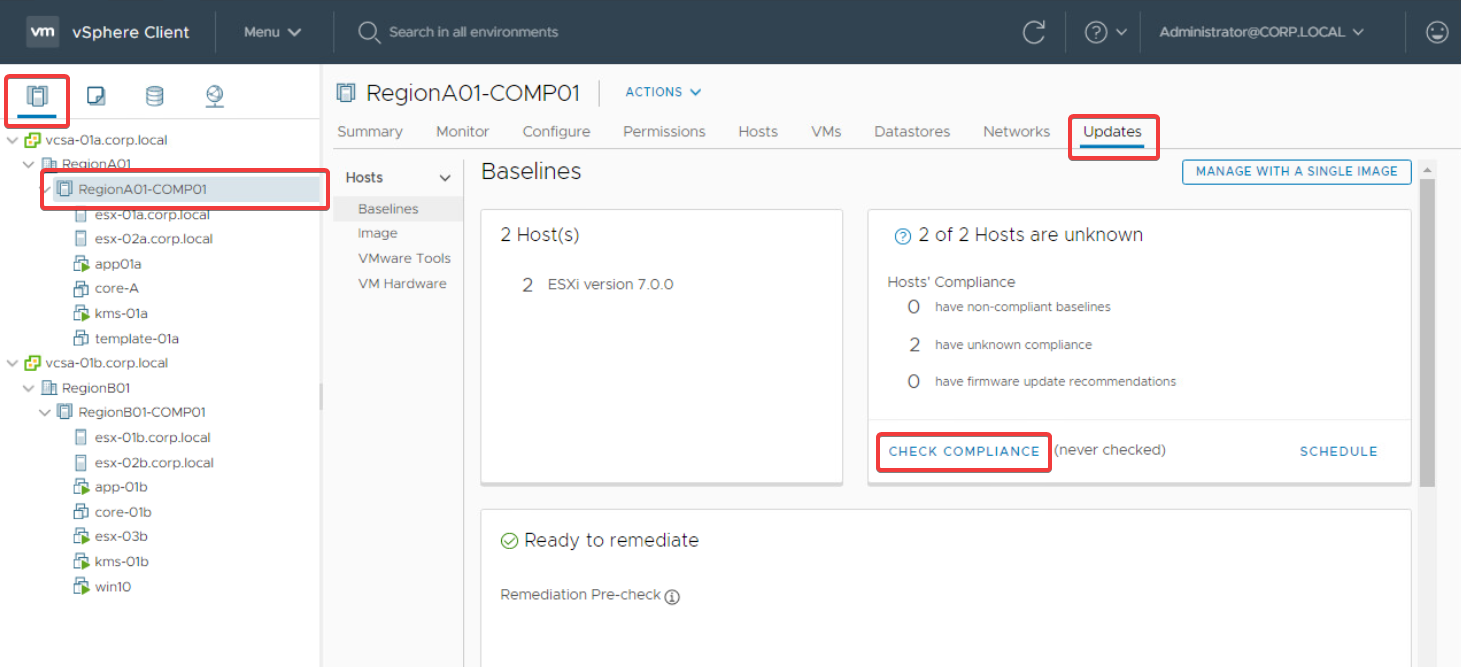
-
Monitor the progress of the compliance scan task in the Recent Tasks pane at the bottom of the console, or by going to Hosts and Clusters > RegionA01-COMP01 > Monitor > Tasks and Events > Tasks.

-
Once the compliance check task completes, you’ll see a warning in the Updates tab if any of the target hosts are missing patches from an attached baseline.
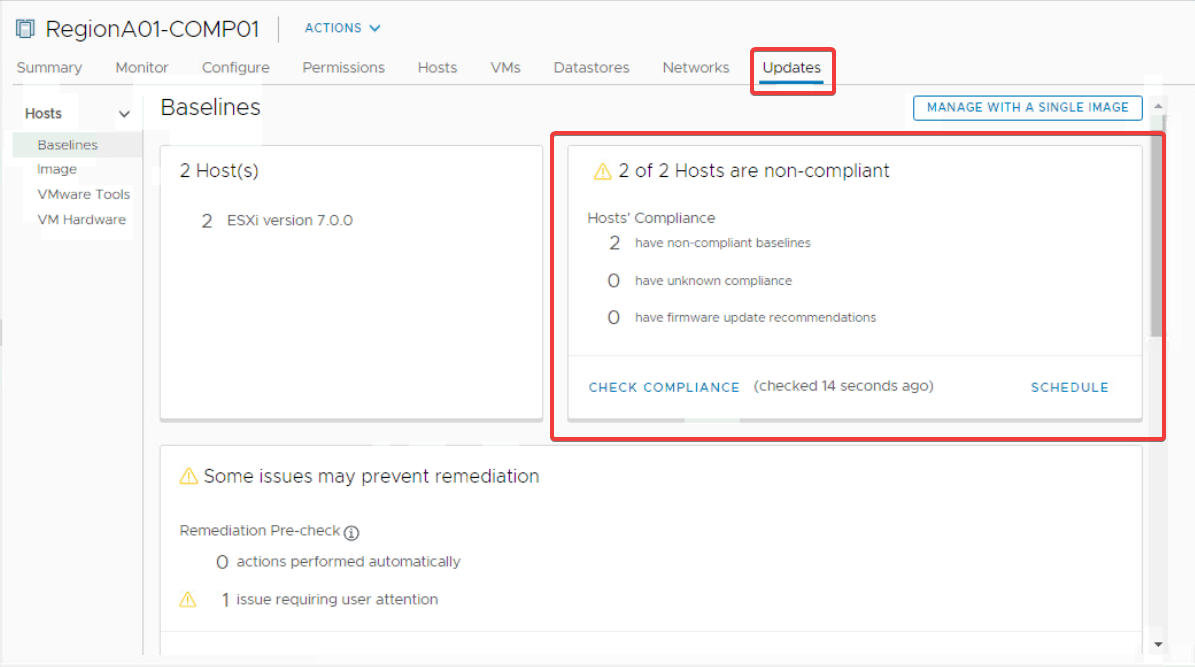
-
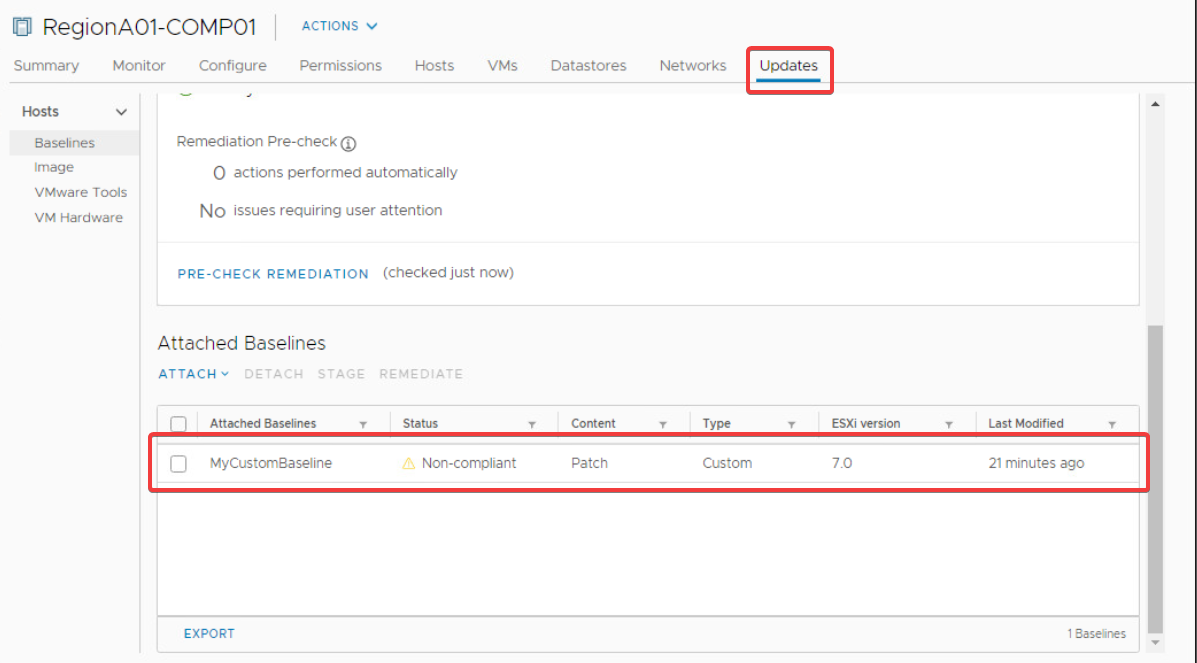
Scroll down in the Updates tab to see which attached baselines are non-compliant.
Remediating hosts with missing patches
Now that you’ve identified which hosts are non-compliant, you can run the remediation task to install the missing patches from a specific baseline.
For example, to remediate all hosts in the RegionA01-COMP01 cluster against the MyCustomBaseline baseline, use the following steps.
In this example the RegionA01-COMP01 cluster has DRS enabled with DRS Automation set to Fully Automated. If you’re cluster is configured differently, you may need to migrate VMs off of each host, and/or put each host into maintenance mode, manually before starting the remediation task.
-
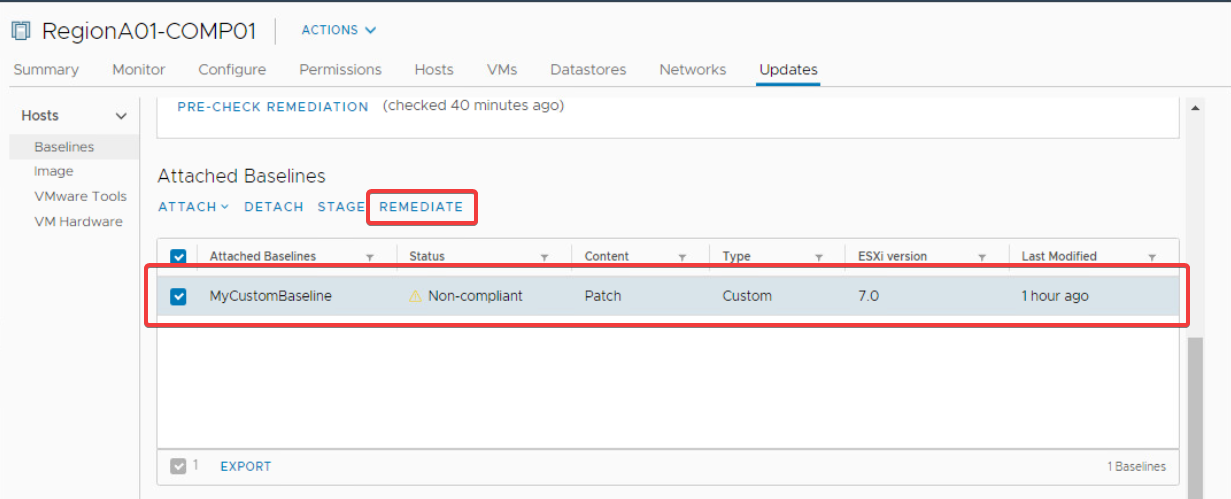
Go to Hosts and Clusters > RegionA01-COMP01 > Updates and scroll down to the Attached Baselines section.
-
Select the MyCustomBaseline baseline and click Remediate to launch the remediate dialog.
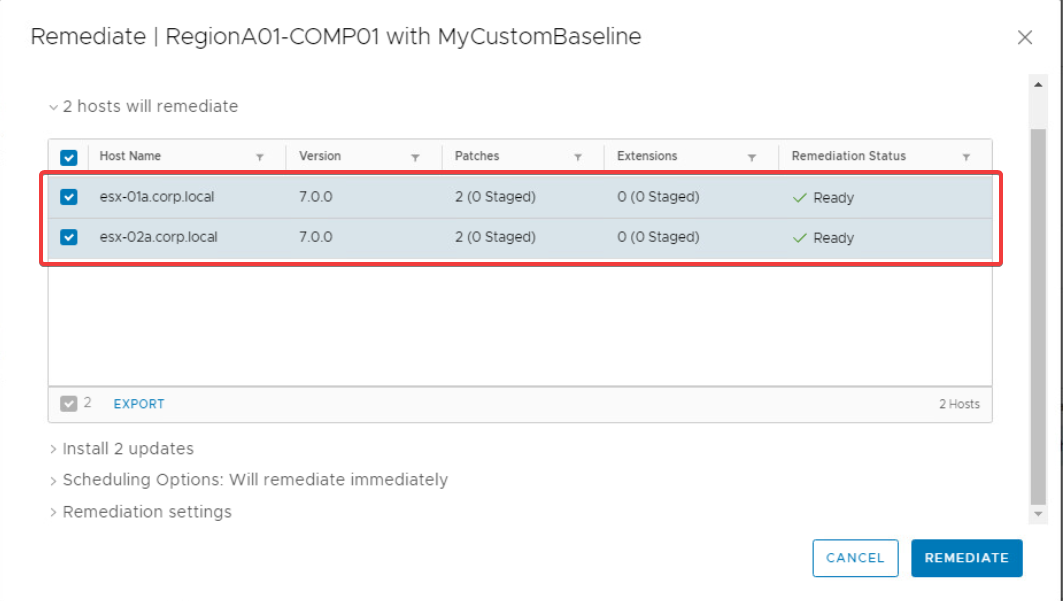
-
In the Remediate dialog, ensure that the required hosts are select in the X hosts will remediate section.
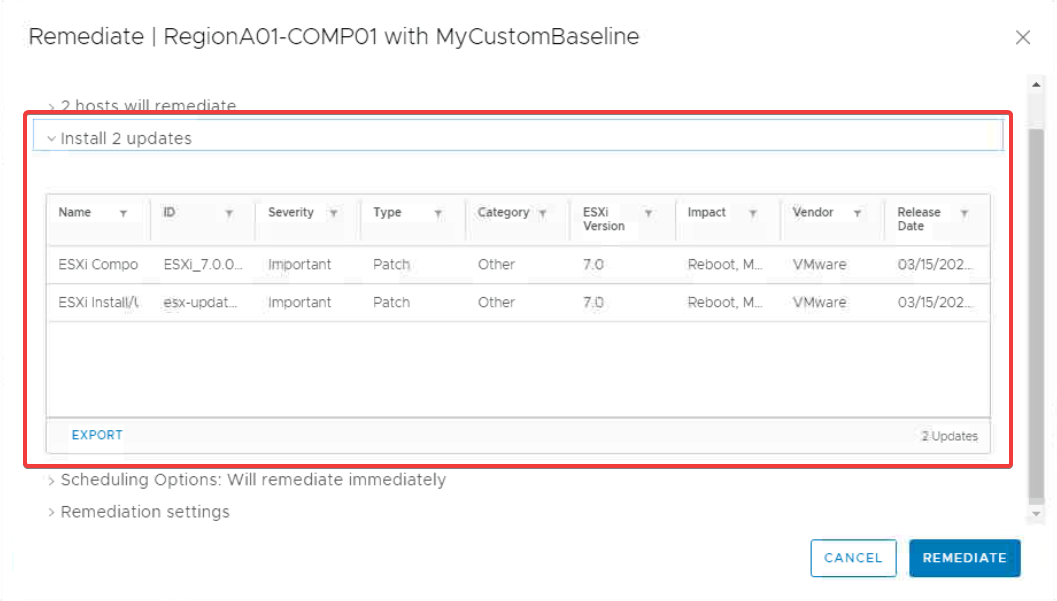
-
Expand the Install X updates drop down and review the patches to be installed.
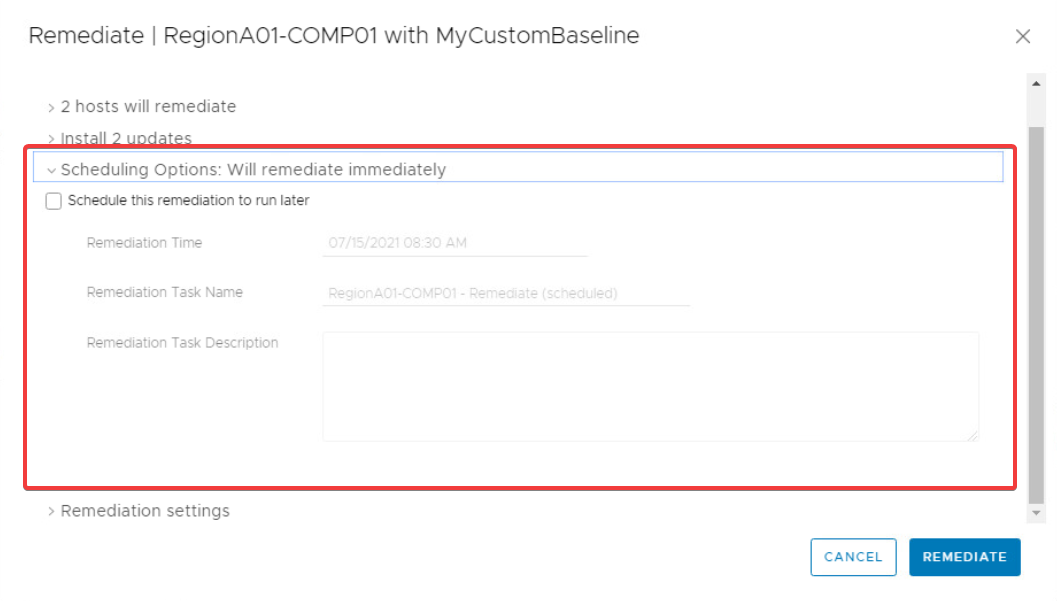
-
If you wish to schedule the remediation task for a later time, expand the Scheduling Options drop down and configure as required. This tutorial will leave the default settings to remediate immediately.
-
Finally, expand the Remediation settings drop down and review the settings before proceeding. Click Remediate to start the remediation task.

This creates a remediation task for the cluster object which you can monitor by going to Hosts and Clusters > RegionA01-COMP01 > Monitor > Tasks and Events > Tasks; as follows:
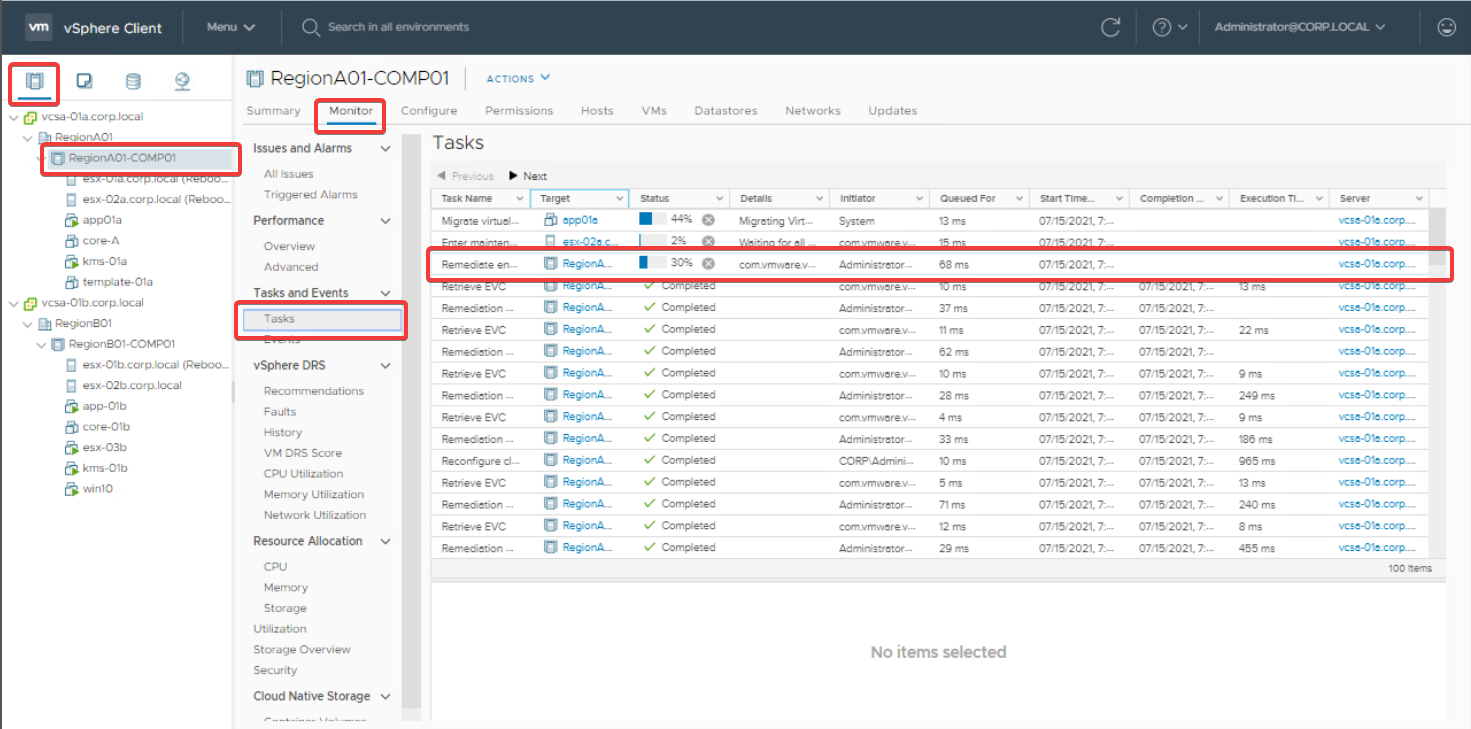
The remediation task performs the following actions for each host:
- Enters maintenance mode
- Installs missing updates
- Reboots host
- Exits maintenance mode
- Runs the check compliance task
-
Conclusion
In this tutorial you’ve learned how to create, attach, and remediate custom patch baselines using VMware Lifecycle Manager. You’ve also created a baseline group containing multiple custom patch baselines. All of the tasks in this tutorial should provide you with the knowledge you need to nail you’re next patching cycle. Happy patching!